
At its simplest, coffee is made by combining ground beans and water.
But depending on how you do that, the final product can vary wildly from light and bright to deep and savory.
This guide highlights the 16 different coffee brewing methods you can try in your own home.
Each method has two a “How To Brew” section with two important pieces of info:
For Reference On Suggested Ratios

If you’ve ever been to Starbucks and ordered a Venti coffee, you ordered drip. It’s the most common coffee brewing method in the world because of both its quantity and convenience.
Drip coffee is made with a dedicated coffee machine that showers coffee grounds with hot water, which percolates through the grounds, passes through a filter, and collects in a carafe.
The result is your standard pot of coffee that almost everyone has poured a cup from.
There’s a lot of variety in drip coffee based on the quality and features of the machine used, but it tends to be clean and balanced. In particular, it’s important that the water is heated to the right temperature (200°F) and is showered evenly over the grounds.
Low-quality drip coffee makers fail at one or both of these crucial functions. Water below the ideal temperature is unable to extract flavorful compounds, creating a thin pot of coffee. Uneven wetting of the grounds over-extracts some areas and under-extracts others, resulting in an uneven and usually bitter cup, so it’s worth looking at guides on sites like Leas Coffee for quality models.
Grind Size: Medium
Suggested Ratio: 1:17
For the uninitiated (or uncaring), a simple Mr. Coffee machine from Walmart will suffice. However, I recommend investing in your morning coffee habit with a quality machine that heats water to the appropriate temperature (200°F) and has a good showerhead for even extraction.
If the machine offers pre-infusion or pre-wetting, where the grounds get soaked for 30-60 seconds before the whole pot brews, that’s a plus.
Machines like the BUNN Velocity Brew have great showerheads for even wetting and brew a full 10-cup pot in just three minutes.
The Breville Precision Brewer is our pick for the best drip coffee maker because it follows SCA standards, offers pre-infusion, and has PID control that constantly monitors and controls water temperature.

There’s a reason 26% of Americans use a single-serve coffee system: They take convenience to a whole other level.
Though Keurig is the big kid on the block, they aren’t the only game in town. Nespresso, BUNN, Cuisinart, Hamilton Beach, Mixpresso, Chulux, and others have their own single-serve coffee systems based on Keurig’s innovative K-Cup pods.
Single-serve brewers are the one-cup cousins to drip coffee makers above. However, most single-serve systems–Keurig included–struggle to heat water to a high enough temperature to ensure proper extraction. As a result, most single-serve coffee machines produce a thinner cup that most coffee drinkers would consider watered down. However, this isn’t always the case.
Grind Size: Medium-fine
Suggested Ratio: N/A
Note: Some single-serve systems are compatible with reusable pods that let you grind and use your own coffee beans. This is great for (a) lower costs, (b) fresher coffee, and (c) greater control over your final cup. I like to grind a little finer than drip brewing’s recommended medium grind to aid in extraction, but it can’t be so fine that it clogs the piercing needle that penetrates the capsule lid.
There are three big concerns when shopping for the right single-serve coffee maker:
Be aware that Keurig 2.0 machines and Nespresso VertuoLine models have pod-scanning technology that lock out third-party pods.
Most single-serve machines work fine when cared for properly, which includes using filtered water and descaling at the manufacturer’s recommended intervals.

Pour-over coffee’s popularity has been on the rise. What you once only used to see in fancy coffee shops has now gone mainstream.
Search traffic for “pour over coffee” is nearly double what it was 5 years ago.
Generally speaking, pour-over is a single-serve method where a cone-like object is placed on top of a mug and filled with carefully ground and portioned coffee beans.
Note: This isn’t always the case. Chemex is the most popular type of pour-over coffee and they have a version that makes 10 cups (50 oz).
Hot water is then poured over the top according to one of several recipes, slowly yielding a custom-crafted cup.
Pour-over takes longer than most other methods and requires far more attention and oversight, but a talented barista armed with a pour-over dripper can bring out the most delicate of flavors from your favorite roast.
Pour-over coffee has a wide range of outcomes depending on how good the grind and pouring technique were but generally results in a bright, clean yet complex cup that highlights the unique notes of the bean you chose.
My wife isn’t a huge coffee drinker, sticking to inoffensive yet conservative roasts like Starbucks Pike Place, and sometimes she remarks that my pour-over single roast from Africa hardly even tastes like coffee. That’s because it isn’t burnt and black!
Grind Size: Medium-fine
Suggested Ratio: 1:12
The most manual and sensitive brewing method on this list, pour-over coffee requires both attention to detail and experience to perfect. There are two aspects that are crucial to master: grind size/uniformity and pouring technique. I can’t stress strongly enough how great pour-over coffee can be when you have a quality burr grinder and a consistent, dialed-in pouring technique.
There are two types of pour-over drippers:
Flat-bottomed drippers are easier to use but cap the ceiling on how good your coffee can be (it can still be great). Conical drippers are harder to dial in but give you more control and are capable of producing some truly elevated cups of coffee.
Having a scale and timer really helps for your first few attempts.
If you notice that water isn’t dripping into the mug on pours 2, 3, and 4 above, consider a coarser grind. Conversely, if it’s dripping too quickly, consider a finer grind.
If you follow the measurements and timings above but find your coffee too weak, try using more coffee. Conversely, if you find your coffee too strong, try using less.
For delicate blonde roasts, try a 1:15 ratio instead of the recommended 1:12. That means less coffee.

My wife and I travel the country full-time in our RV. I like a big pot of coffee but I don’t want to dedicate the countertop space (or battery resources) to running a 1200W+ drip coffee maker.
Enter my French press.
It’s 34 oz, made of stainless steel, and nearly indestructible. It also couldn’t be easier to use, but we’ll get into that below.
French presses are immersion brewers, meaning the grounds and water are combined completely for the entire extraction. This is noticeably different from drip and pour-over, which slowly trickle water through the grounds.
Rich and muddy. The French press uses a metal filter to separate the grounds from the brewed coffee, and the pores in this filter aren’t as fine as your typical paper coffee filter. That means the resulting coffee isn’t as clean. In fact, French press coffee often is referred to as “muddy.”
Another consequence of using a metal filter is that compounds in your coffee aren’t lost to the filter. Paper filters absorb some of these flavorful oils, which means you don’t get to enjoy them. Instead, whatever is in your bean ends up in your cup. If you like rich, complex coffee, French press is the way to go.
Grind Size: Coarse
Suggested Ratio: 1:15
French press coffee is incredibly easy to brew but takes some practice to dial in the proper contact time. Too short yields thin coffee. Too long is too bitter.
This recipe is for a 34 oz French press. Scale volumes up or down to fit your coffee maker, preserving the ratios.
I have an opaque stainless steel French press for its durability, but I absolutely love the glass French presses that let you watch the magic happen. Some say plastic French presses give a plastic-y flavor, which I have never noticed but maybe I’m wrong.
Get a French Press with enough volume to meet your maximum coffee brewing demands. I’ve had family visit and I’ve needed to make coffee for everyone, which means whipping out my French press, pour-over, and AeroPress to accommodate everyone. It would be easier if I had a huge 50 oz French press to brew it all in one place.
Having a good grinder is essential to brewing great French press coffee. Store-bought coffee is a little on the fine side–French press should be a coarse grind. Blade coffee grinders create a ton of super-chopped fine particles that get over-extracted with the French press’s longer contact time and then sneak through the filter to leave a lot of sediment at the bottom of your cup.
Heating up the French press with hot water before brewing will reduce heat loss and keep your coffee steeping at the optimal temperature for extraction.
A gooseneck kettle is always preferable because it allows better control over the blooming phase, but it isn’t essential for French press.

French press is a method of brewing coffee by steeping, one where you press on the plunger to push the grounds down to the bottom of the coffee maker.
This version of steeping is more like making tea whereby grounds are put in a sieve and immersed in hot water for a few minutes and then the whole sieve is extracted.
The Fellow Duo Steeper is an example of just such a brewer. The grounds and water are immersed in the top chamber for a set period of time, and then you twist the middle section to release the now-brewed coffee into the bottom chamber.
The Duo’s mesh filter is twice as fine as a French press’s, meaning a cleaner cup of coffee, and the grounds are fully separated from the coffee instead of just pushed to the bottom.
Steeped coffee retains many of the strengths of French Press–complete extraction of all flavorful compounds without loss to a paper filter–without the side effect of a muddy cup. It still won’t be as bright and clean as drip, pour-over or other paper filter methods, but it’ll be cleaner than French press coffee.
Grind Size: Medium-Coarse
Suggested Ratio: 1:15
There are a couple types of steepers available. One is the Fellow Duo shown above where water falls into a bottom chamber using gravity. A second is the SoftBrew immersion brewer where grounds are steeped in hot water in a sieve and then the whole sieve is removed as if you were making tea.
The same tips for French press apply here as well:

Briefly leaving the world of hot coffee, let’s jump to the final form of immersion brewing: cold brew.
Cold brew coffee is made by steeping coarsely ground coffee in room temperature water for 12-24 hours. Because room temperature is used, longer contact times are needed for proper extraction.
However, this results in a totally different type of coffee. Take a look at the image below to see why.
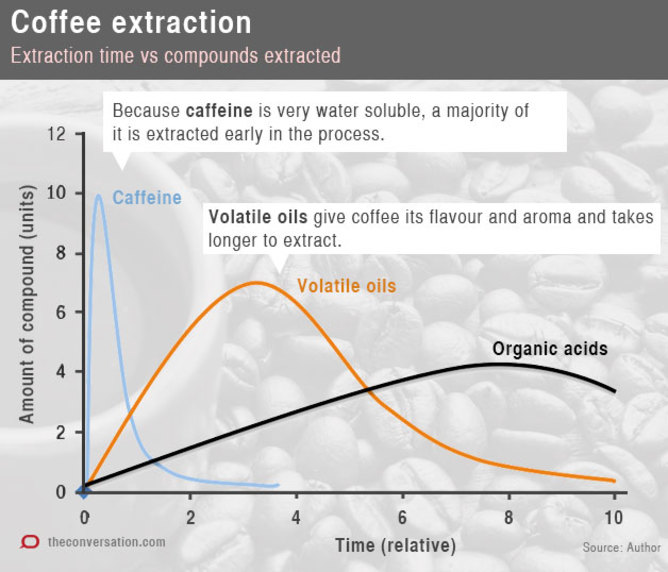
When coffee and water are combined, caffeine is extracted first, followed by flavorful oils and then bitter organic acids. With standard hot brewing, this whole process takes minutes. With cold brew it takes hours. This leaves many of the bitter organic acids behind, resulting in a smoother, less bitter, less acidic cup of coffee.
It’s also far more concentrated than your standard drip, pour-over, or immersion brew. Most people cut their cold brew by adding ice and/or their favorite type of milk or creamer to reach the proper concentration.
While typically enjoyed cold, that isn’t necessary. You can heat up cold brew coffee to standard hot coffee temperatures without risk of it becoming bitter. All of those bitter compounds were left in the spent coffee grounds.
Cold brew is less bitter and acidic than standard hot brewed coffee and typically much more concentrated if steeped for 18-24 hours.
Its thickness or richness will be determined by the type of filter used. When I make cold brew at home I use a cheesecloth filter, which is fine enough for a fairly clean brew with minor amounts of fine sediment at the bottom that I let settle out. However, this can be minimized with a proper grinder and a coarse grind.
Most commercial cold brew coffee makers use a fine metal filter which, when combined with a uniform, coarse grind, leave little sediment behind.
Note: While there are many high-quality cold brew coffee makers available for purchase, you don’t need to buy one. I make my cold brew in a big glass jar with a cheesecloth filter, but a mason jar or French press works too. Best made in bulk due to long brew times, any means of steeping coffee grounds in water with the ability to separate them later will work fine.
Grind Size: Coarse
Suggested Ratio: 1:5
Cold brew coffee requires the most coffee per volume water, but remember that cold brew coffee is intended to be diluted later with ice cubes, cold water, or milk. At a typical 1:1 dilution (equal parts cold brew and diluting liquid) it really isn’t much more expensive than any other brew method on this list.
This recipe yields 32 oz of cold brew concentrate (factoring in about 20% loss to absorption in the grounds). Scale up or down accordingly while sticking to the ratios.
As mentioned above, you don’t need a dedicated cold brew coffee maker. A mason jar with cheesecloth will suffice and is a good way to make cold brew each morning in advance of the next day. I make it in larger quantities using a large glass jar.
The 1:5 ratio is rather concentrated. You can experiment with different ratios, contact times, and dilutions to find what works for you.
I strongly recommend you use high-quality coffee beans as cold brew really pulls out the flavor in your chosen roast.
If you’re brewing with a cheesecloth strainer or other bag, gently squeeze it to wring out a little extra coffee concentrate. Don’t squeeze too hard or you’ll force finely ground sediment into your coffee.
Cold brew can be stored for about a week in your refrigerator, so I always recommend brewing in bulk.
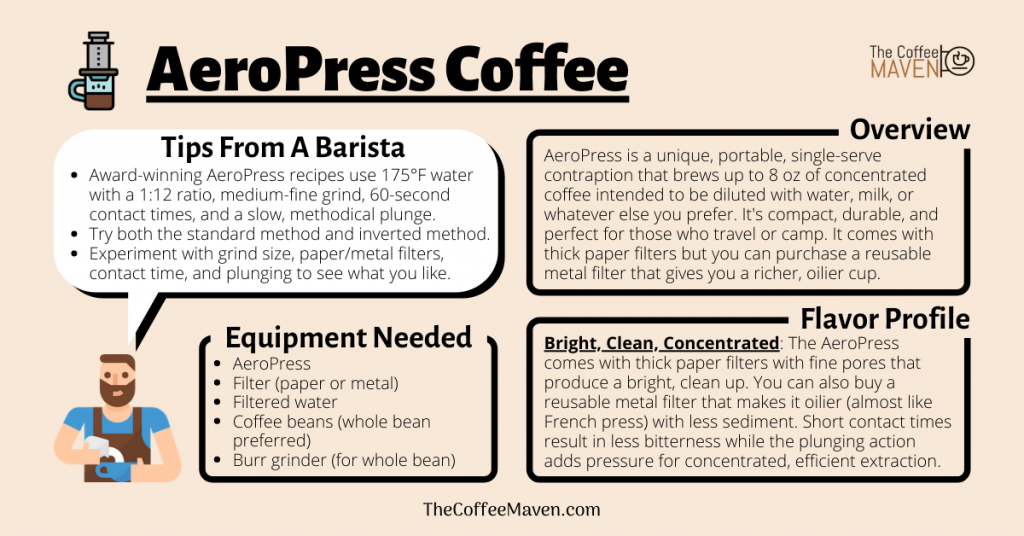
The AeroPress is a unique, portable, single-serve contraption that brews up to 8 oz of concentrated coffee intended to be diluted with water, milk, or whatever else you prefer.
I love my AeroPress for its durable, compact construction. I’ve had it for like seven years and it’s my go-to brewing method when camping or going out of town.
AeroPress uses a fine paper filter that’s thicker than your standard drip coffee filter. That keeps all sediment out of your cup and results in a clean-tasting brew, but it also pulls out some of the flavorful compounds.
You can buy an AeroPress-compatible stainless steel filter that has larger pores and doesn’t absorb any compounds. This is what I use and it produces a more French press-like cup.
In general, AeroPress coffee is somewhere between the bright clarity of pour-over and the complex muddiness of French press, depending on how you use it. Our AeroPress vs French press comparison gives a nice side-by-side look at the two.
Grind Size: Medium-fine
Suggested Ratio: 1:12
Note: There are two ways to brew with an AeroPress: the standard method and the inverted method. I tend to use the inverted method because it lets me steep the coffee as long as I want without droplets falling into my cup.
The following recipe is my go-to and won the 2015 World AeroPress Championship (yes, that’s a thing) using a more specific 1:11.5 ratio.
Shopping tip: Get an AeroPress. That’s about all there is to say on that.
I prefer the inverted method but both methods will do. The recipe above uses 175F water, which prevents bitterness, but you can go higher if you prefer a hotter cup.
When flipping the setup (step 10 above) do it quickly to prevent spilling.
Experiment with grind size and paper/metal filters to find what works for you. Because the paper filter has much smaller pores, I like to use a finer grind–not quite as fine as espresso but a touch smaller than medium-fine.

Stovetop coffee makers are like an AeroPress on steroids, brewing a super-concentrated espresso-like beverage that isn’t true espresso.
The Bialetti Moka Pot is the most famous stovetop coffee maker. You’ve probably seen one somewhere, including your local thrift store. That’s because these things are virtually indestructible. They have no moving or electric parts and last forever.
Stovetop coffee makers have three parts:
Pressure builds as water in the lower chamber heats up and turns to steam, forcing water through a funnel into the middle chamber with coffee grounds. Eventually, pressure forces water through the grounds and up through another funnel into the top chamber, where it collects. Once all of the water has evaporated and been forced through the grounds, the stovetop coffee maker sputters, letting you know it’s done.
Stovetop coffee is concentrated and espresso-like, but it isn’t true espresso because it fails to meet the required 9 bars of pressure. And because it takes 4-5 minutes to brew with a fine grind, sometimes it’s over-extracted and tastes rather “roasty.” It’s close to espresso but you can tell it isn’t quite espresso.
Grind Size: Fine
Suggested Ratio: 1:12
Stovetop coffee makers come in all different sizes. The following recipe is for a 4-cup coffee maker, so scale all volumes according to the same ratios.
If you want to try stovetop coffee, get a Moka Pot. They last forever.
Most recipes for stovetop coffee call for an espresso grind, and that’s what I included above. However, you can make your grind medium-fine or even medium to cut down on bitterness. The result will be a slightly thinner, less concentrated coffee and probably not suitable for specialty drinks, but it may taste better straight up.
Don’t tamp or pat down the coffee grounds. Simply tap on the counter to level.
Wash regularly with a non-scouring pad to keep your water and coffee tasting fresh.

Percolators are like stovetop coffee makers with one key difference: They recycle the brewed coffee back into the lower water reservoir, meaning the coffee keeps getting brewed and brewed until it gets richer and richer, ultimately leading to over-extraction for those who aren’t careful.
It works by the same general principle as the stovetop coffee maker–steam pressure pushes water up a funnel–but instead of forcing its way through the grounds and into a top chamber, percolators push water all the way straight to the top where the hot water rains down on a bed of coffee grounds where it percolates through the grounds and back into the lower chamber. Then the whole process starts again.
Percolators remove all art and subtlety from the coffee-making process. Delicate notes from small-batch roasts tend to be lost with the overarching flavor being “roasted coffee.”
Grind Size: Coarse
Suggested Ratio: 1:17
Though a percolator looks and acts like a stovetop coffee maker, there are two key differences: grind size and attention to heating.
Percolators are old school and you can probably find a good one at your local thrift store for $3. Just make sure it isn’t rusted and hasn’t been scoured too badly. Of course, they aren’t expensive brand new either.
A coarse grind is essential to prevent both over-extraction and getting grounds in your coffee.
Temperature and the duration of percolation (nice rhyme) are highly specific to your stove and taste preferences, so experiment away.
Clean thoroughly after every use to maintain the freshness of each subsequent brew and be careful not to scratch your percolator with a scouring pad.

No, this isn’t another household appliance from Shark Ninja; it’s actually a type of coffee maker. And a cool one at that! (If you’re a physics geek like me.)
Also called siphon coffee makers, a vacuum coffee maker operates on the same principles as a stovetop coffee maker or percolator: steam pressure forces water up from a bottom chamber and into a top chamber. However, they have some key differences.
Vacuum vs Stovetop Coffee Makers: Stovetop coffee makers push water up a funnel, through coffee grounds, and into a collecting chamber on top. Coffee is poured from the top. Vacuum coffee makers push water up through the grounds and into a top chamber containing ground coffee. Once removed from the heat source, the coffee goes back down through a filter into the bottom chamber from where it’s poured.
Vacuum vs Percolators: Percolators continuously recycle the coffee that rains down through the bed of ground coffee. The coffee in the lower chamber keeps brewing through the grounds again and again. Vacuum coffee makers pass water into a top chamber containing the grounds where it steeps like a French press. The water only combined with the coffee grounds one time.
Vacuum coffee makers are a sort of novelty item and I have never used one or tried coffee from one. They have some popularity in Asia but aren’t widely used outside the continent.
Due to the combination of full immersion and high-pressure brewing, vacuum coffee is able to achieve the best of French press, pour-over, and stovetop coffee. It’s complex like French press, clear and crisp like pour-over, and full-bodied and concentrated like stovetop. Some say it’s the best way to brew a flavorful cup, and it’s a shame I haven’t had the chance to try it.
Grind Size: Medium
Suggested Ratio: 1:12
When shopping for vacuum coffee makers, look for models with rounded bottoms that require a butane-powered flame.
If it takes more than 60-90 seconds for the coffee to return to the bottom chamber, try wrapping the bottom chamber in a cool, damp towel. This helps the suction work more quickly.
If it’s still taking too long, try using a coarser grind.

Unique from every other coffee brewing method on this list, Turkish (or Cowboy) coffee is a full immersion method with one key difference.
You never separate the grounds from the coffee.
Turkish coffee is made by grinding coffee beans extra fine and combining them with water in a cezve or ibrik. Essentially, it’s a small metal pot at the end of a stick that you boil over an open flame.
When done right, no type of coffee on this list is as bold and intense as Turkish coffee.
OK, so why the name “Cowboy coffee”? Imagine you’re a cowboy in the old west. It’s sunrise and you have a pot and some coffee, but you don’t have a filter. You’re traveling light…you’re a cowboy! You can still enjoy a cup of coffee before hitting the trail by crushing your beans, combining them in a pot with water, and boiling.
How fine of a grind are we talking? According to Turkish Coffee World, a good Turkish grind is 15 times finer than espresso and 450 times finer than drip.
Cowboy coffee is like French press on steroids. It’s thick and muddy–more literally this time–because the grounds are still in the cup. It’s the closest thing to drinking liquified coffee beans.
Grind Size: Extra fine
Suggested Ratio: 1:9
After pouring from your cezve into your cup, let it sit for a minute to let any stray grounds settle to the bottom.
Experiment with more or less coffee grounds to dial in the richness (and mouthfeel) you prefer.
You don’t need to spend hundreds on a top-of-the-line espresso grinder. A manual spice grinder will suffice in a pinch.
Speaking of a pinch, try adding a dash of spices like cardamom, cinnamon, nutmeg, cloves, or vanilla powder.

This isn’t so much a way to brew coffee, but it is a way of making coffee and that’s close enough for me. Instant coffee is made by combining hot water and instant coffee powder or crystals. Stir them in to dissolve and boom–you’re done.
I won’t hate on instant coffee like a lot of other coffee blogs do. Some people aren’t huge fans of coffee and just like having a hot cup of roasty beverage in the morning to perk them up. That’s fine! If this is where you fall, check out some of the best instant coffees available.
Note: Instant coffee has a cool history and there are two interesting methods of making it. That link I just gave summarizes everything, and I think you should read it. Learning something new is always great! (Plus there’s a Seinfeld video in there.)
Instant coffee won’t win any awards. You won’t mix a spoonful of Anthony’s Organic Instant Coffee made from South American beans and marvel at the delicate nuttiness that lingers after each sip.
Instant coffee tastes more like what you get at the hospital vending machine at 2:00 am on a Tuesday while you wait to hear how many stitches your husband needs after falling off the third step of a small ladder reaching for that probably-expired can of Beef-a-roni that he’s pretty sure is at the back of the top shelf in the pantry from that time your nephew came to visit for the weekend because his parents needed to “help a friend move” even though you’re pretty sure they went to the Cape instead to get away from their spoiled, sugar-addicted maniac of a son.
(I said I wouldn’t hate on instant coffee but I guess I did just make fun of it…)
Grind Size: N/A
Suggested Ratio: 1:17
Since instant coffee comes in a powdered or crystallized form, we’ll skip the grind sizes and suggested ratios and stick to the recipes on the side of the jars.
There are a wide variety of instant coffees. In fact, it’s estimated that nearly 50% of all green, unroasted coffee beans are used to make instant coffee! Experiment with new brands and see what’s out there. Folgers and Nescafe are big name brands but they aren’t the only game in town.
Hotter water will dissolve more instant coffee powder, so get your water to 200°F or hotter if you want a really strong cup.
Don’t let anyone stop you from enjoying your instant coffee drink. It may not be the best quality cup, but you didn’t have to use one of the newfangled brewing systems elsewhere on this list!

Recently, companies like Wacaco have emerged with innovative espresso makers that you can take on the go.
These portable espresso machines use hand power to extract a shot from either ground coffee or a capsule, but–like we saw with stovetop coffee and AeroPress coffee – these machines don’t make true espresso because the requisite 9 bars of pressure hasn’t been added.
While not true espresso, it’s fairly rich and concentrated with the depth of flavor varying by the bean used. It’s also on the sweeter side thanks to the limited contact time.
Grind Size: Fine
Suggested Ratio: 1:9
The following instructions are for the Wacaco Minipresso GR, which uses ground coffee instead of a capsule. Modify the steps based on the instructions of the model you’re using.
The Minipresso GR uses ground coffee and the Minipresso NS uses capsules. For that reason, the GR will make better “espresso” but the NS will be much more portable.
To aid in extraction, try running one cycle with just hot water and no coffee to warm up the portable espresso machine’s internal components.
When pumping, try to make each pump last a full second.
If it takes more than the 6-9 pumps for the espresso to start coming out, try tamping less firmly or use a slightly coarser grind. Conversely, if espresso starts coming out before 6-9 pumps, try a finer grind or tamp a little bit.

Single-serve coffee (like Keurig) is different from this type of capsulized convenience: single-serve espresso.
Nespresso is the pioneer and industry-leader for single-serve espresso with their machines that brew single shots (or specialty beverages depending on the model) at the push of a button.
There are two types of Nespresso machines–OriginalLine and VertuoLine–which have their differences. You can read about those here. There are also some other competitors like Mixpresso that have single-serve espresso options, and even Keurig tosses their hat in the ring with its K-Cafe model.
Single-serve espresso machines like Nespresso advertise 15 bars of pressure during extraction, but it’s an inconsistent 15 bars resulting in something that still isn’t true espresso.
However, I won’t disparage these machines. As my wife and I travel the country full-time, we use a Nespresso Essenza Mini from time-to-time, extracting espresso-like shots in about 60 seconds to make our favorite specialty beverages with the help of our Bodum frother.
It depends on the capsule but single-serve espresso can be concentrated, rich, and flavorful. In my opinion, Nespresso OriginalLine machines are better because they produce a richer, hotter shot but VertuoLine machines have a more pronounced (though foamier) crema.
Grind Size: Fine
Suggested Ratio: N/A
These instructions are for a Nespresso machine using a capsule, but you can also use refillable capsules and grind your own coffee.
I wouldn’t get anything other than a Nespresso machine. I’d also go with a Nespresso OriginalLine machine because it makes a better “espresso” and doesn’t have a capsule scanning system to lock out third-party capsules.
Only use filtered water and descale your machine regularly to ensure your coffee’s flavor isn’t negatively affected.

Just like the first locomotives used steam to generate power, so too do steam espresso machines. As water heats up in the machine, it expands and turns to steam, which forces water into and through the puck.
Essentially, it’s an electric version of a stovetop coffee maker or Moka Pot.
And like a stovetop coffee maker (and unlike a true pump espresso machine) you can usually make full “pots” of espresso-like concentrated as opposed to single shots.
The resulting shot isn’t true espresso because the requisite 9 bars of pressure wasn’t applied, but it’s still a concentrated espresso-like beverage that you can enjoy without the hefty price tag of a true espresso machine.
Steam espresso machines make a concentrated espresso-like beverage that loses the subtle flavors of fresh, premium roasts. They also fail to generate an authentic crema.
Grind Size: Fine
Suggested Ratio: 1:4
The following instructions are for a 2 oz doppio (double shot) on the Mr. Coffee ECM260. Scale up or down accordingly.
Steam espresso machines are an inexpensive, compact way to get your caffeine. I still prefer a single-serve capsule machine to these, and definitely prefer a pump espresso machine.
Tamping is the most challenging part of the process. If your coffee comes out too thin, try grinding finer and/or tamping harder. If your coffee comes out too rich, try the opposites. Only adjust one variable at a time, however.

At long last, true espresso! Pump espresso machines run the gamut from less expensive in-your-home models to super-sophisticated high-end models in the hipsteriest of coffee shops.
No matter whether they’re semi-automatic (you do the tamping and cleaning) or super-automatic (grind, brew, clean at the push of a button), they all operate by the same pump-powered mechanism. The result is a true shot of espresso, which is defined by the following criteria:
Rich, flavorful, and amazing. A truly great shot of espresso is one of life’s best pleasures–and I’m not exaggerating. It can take hundreds or thousands of shots until you get down a repeatable process that pulls a complex, perfectly extracted shot. Thankfully, there are trained baristas in nearly every non-chain coffee shop to deliver what you need at a moment’s notice.
Grind Size: Fine
Suggested Ratio: 1:4
These instructions are how to pull a doppio (double shot) with a semi-automatic espresso machine.
Note: The Suggested Ratio section above doesn’t exactly apply here because espresso ratios are measured differently: weight of coffee beans to weight of final shot. For a double espresso shot, the ratio is 1:2. Your goal is to grind and tamp appropriately and run the shot for a predetermined amount of time (usually 25-30 seconds) with the resulting shot registering at your target weight. For tips troubleshooting your shot, check out the Shopping & Brewing Tips section below.
It’s easy to drop a few thousand dollars on a top-end espresso machine let alone a complete coffee station. Before you spend $700 on a Rancilio Silvia or $1,700 on a Rocket Appartamento, make sure you have a top-notch grinder. Without a great grind, you’re wasting your premium espresso machine’s potential.
You’ll also have to make the decision between semi-automatic and super-automatic. Semi-automatic espresso machines are what you’ll see in coffee shops. They give you total control over your shot, but subsequently require more maintenance and skill to operate.
Super-automatic machines are what you see in cafeterias, co-working lounges, and hotels. They’re one-button do-it-all models that are simple to operate, but that convenience requires the home barista to relinquish control over the shot. Ultimately, that puts a ceiling on how great the shot can truly be.
Note: For more detailed “how to brew espresso” instructions, click that link.
Not sure how much pressure 30 lbs is? If you have a bathroom scale, push down on it with your thumb until it reads 30 lbs to get an idea.
If you pulled your shot for 25-30 seconds but it was too thin or weighed too much, try using a finer grind or tamping harder. Conversely, if it was too thick or didn’t weigh enough, try a coarser grind or don’t tamp as hard.
When you’re starting out, a pressurized portafilter is the way to go. When you’re ready to take your espresso game to the next level, it’s time to try out bottomless.
And there you have it, 16 different coffee brewing methods!
